Windows LNK Parsing Utility (lp)
Introduction
lp is a command line version of a Windows SHLLINK parser that was designed to operate on shortcut files, but can parse SHLLINK artifacts from files that generate Jump Lists as well. Originally inspired by the forensic class taken from the SANS Institute back in Jan 2010, lp is a useful tool for any computer forensic toolkit.
While shortcut files can reside in just about any directory, the primary location for many shortcut files is: %APPDATA%\ Microsoft\ Windows\ Recent\ <shortcut files>, where the %APPDATA% is resolved to C:\Users\<user account>\AppData\Roaming. This is where the operating system automatically creates a shortcut based on a user double clicking on an application to launch it.
Of interest to the forensic investigator is the metadata associated with this type of file, since they offer many useful artifacts when determining activity on a computer. Some of these artifacts include:
- a. The path to the target file/directory it references along with modify/access/create timestamps
- b. The size of the target when it was last accessed.
- c. Serial number of the volume where the target was stored.
- d. Network volume share name (if applicable).
- e. Target attributes, such as whether it was 'read only', 'hidden', 'system', etc.
- f. One of the MAC addresses associated with the host computer (available when an Object ID is present).
When trying to parse out the above artifacts, one can turn to the Microsoft open specification agreement, where there is a published version of the Windows SHLLINK format. From this specification, one can see many of the details needed to understand the structures of the format.
The parsing engine of lp makes use of the Microsoft specification to extract much of the shortcut internals. Where the specification lacked details, we ended up using empirical data to help understand some of the opaque data structure types allowing us to parse the SHLLINK format more fully.
SHLLINK Metadata and What lp Extracts
When creating tools that parse artifacts that still have unknowns associated with them, there is a balance on what data should be presented to the user and which should not. On one hand, we at TZWorks LLC personally like to see all the data artifacts, complete with file offsets, so we can trace each artifact in a hex editor. This allows one to hand carve the data and is very important to the reverser. However, this type of data is most likely to be too noisy for the normal user. Therefore, the version that is available commercially is a subset of the options we consider useful to the general investigator. Some of these additional options include: (a) carving SHLLINK metadata from images and live volumes, (b) handling the nuances of the Destinations files used in the Jump Lists and (c) additional output format options.
To see the lp's default output, and hence some of the SHLLINK metadata, below is a series of snapshots that represent how various data can be embedded into the LNK file. (Note: The sample LNK file data was provided by Rob Lee from the SANS Institute as exemplars, which he took from the Donald Blake image used in the SANS 408 Forensics class).
Example of a more common LNK file's output
When analyzing lp's output, a number of timestamp data is shown, including the shortcut file timestamps as well as the target (what the shortcut file points to) timestamps. The output should contain the size of the target, if it is a file versus a directory, and will contain a path to the target. As part of the SHLLINK specification, there is also what Microsoft calls a TrackerDataBlock. This is what we refer to as the object identifier (ID), since it is really the object ID of the NTFS MFT record associated with the target file or directory.
The object ID is another way to reference the target file/directory and ultimately allows the operating system a straight forward way to 'track' the target file or directory at the lower level NTFS object ID/MFT entry level. This object ID is part of the target file and moves where the target moves. In the SHLLINK metadata there are two object IDs: (a) one that is recorded when the shortcut is created, and (b) one that is the current one. For the most part these two object IDs are the same and will only differ in certain conditions. Internally, lp makes note of both object IDs, however, it will only display both if they are different.
Associated with the object ID is a creation timestamp and media access control (MAC) network interface identifier that was present during the object ID creation. The format of the object ID follows the Type 1 specification outlined in RFC 4122 (Universally Unique Identifier URN Namespace). Using this specification, one can extract the object time and MAC address from the object ID itself. What this means is there is NO timestamp or MAC network interface artifact explicitly present in the SHLLINK metadata. Any data shown in lp's output for these fields is from implicitly deriving it from the object ID itself. When analyzing the below MAC network interface extracted, it identified one of our VMWare network interfaces and not the primary computer's network address.
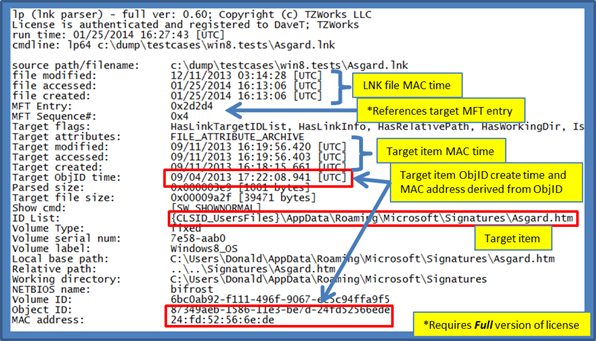
While there are a number of paths to the target, the key one is the one labeled 'ID List' shown above. It is generated from a series of SHITEMID structures embedded in the SHLLINK metadata that is used to construct the final path of the target. It is important for any SHLLINK parser to pull this out, since Windows defaults to the path described in this structure (if it exists) when resolving where the target file or directory is located.
Example of breaking out more metadata from the LNK file's IDList
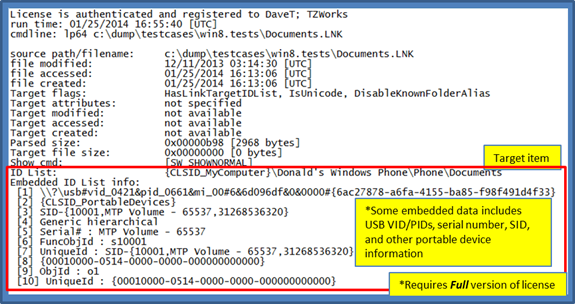
If the LNK file references a file from a portable device, more detailed information can be found out about the portable device that was used. For example, if the portable device interfaced with the computer as a USB device, the LNK file may record data such as vender ID and product ID of the device that was used complete with serial number. This would be useful in tracking down that a particular device was used on that computer while accessing a file on the device. Below is an example demonstrating this type of information is available in a LNK file.
Example of the LNK file utilizing the PropertyStoreDataBlock
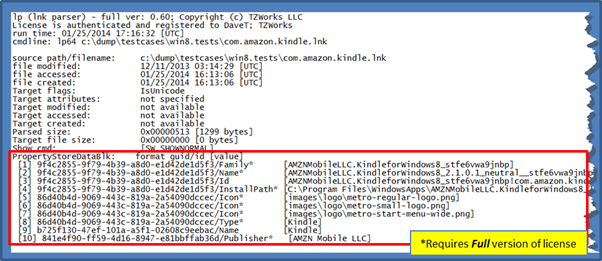
In some cases, the LNK file will make use of what is called a PropertyStore data block. This block encapsulates much metadata that could be useful in an analysis. Below is an example. For this example, this particular LNK file did not record a target file's dates or other stats common to LNK files. In this case, most of the data about the target file was started in the PropertyStore data block.
How to use lp
For starters, lp is a console application. Therefore, to be able to access, and thus parse, shortcut files across all computer accounts, one will need to open the command prompt with administrator privileges first. Without administrator privileges, one will be restricted to only accessing your account's shortcut files or those common to the operating system.
One can display the menu options by typing in the executable name without parameters. By using the options in various ways, one can process SHLLINK metadata with six general 'use-cases': (1) processing an individual shortcut file, (2) carving from a captured image, (3) extracting from Jump List files, (4) processing a collection of files, (5) carving from a mounted volume, and (6) carving from a VMWare volume.
These 'use-cases' are annotated in the screen shot below.
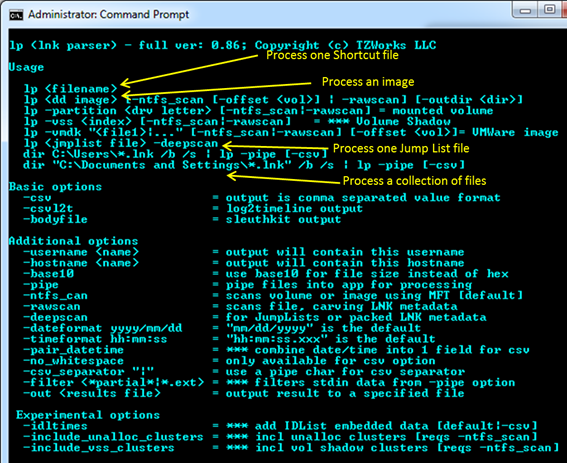
For output options, there are four possible formats to choose from: (1) default output, which is an unstructured output. This information is useful if not trying to parse the artifacts into a database. (2) -csv (comma separated value) option will render the output so that all the metadata is rendered with one record per line with each field separated with a comma. The last two are: (3) -csvl2t and (4) -bodyfile. Each will attempt to conform to either the log2timeline format or the SleuthKit's body-file format, as appropriate.
Case 1: Parsing an Individual Shortcut File
The most basic option is to parse an individual shortcut file. To do so, just pass the name as the parameter to lp, as shown below, and the output will default to the long form shown in Section above.
lp <shortcut filename>
Case 2: Parsing a Capture Image for SHLLINK metadata
To parse an entire image of a drive that is contained in a file (eg. a 'dd' type image), one can either use the -rawscan or the -ntfs_scan option. This first option ignores volume boundaries and file system internals and does a brute force scan, by looking for any SHLLINK signatures. For each signature found, lp will attempt to carve out any SHLLINK metadata. This type of scan will carve out signatures from allocated, unallocated or slack space. The second option assumes the image contains an NTFS volume, and uses the file system internals to find LNK and/or Jump List files that contain SHLLINK data.
rawscan option
If using the -rawscan option, lp is agnostic as to the file system type, as it treats all disk formats the same. While this is good news in that it can work on any file system, it is also bad, in that it does not try to reconstruct files that are fragmented across non-contiguous clusters. Empirical results show, however, that since the SHLLINK metadata is relatively small, the fragmentation of these files is close to nil. Thus, this type of scanning/carving/parsing shows a high success rate in gathering the artifacts.
When parsing a large image, there will presumably be many SHLLINK entries carved out, thus it is recommended to: (a) use the -csv option to place one record per line, and (b) redirect the output into a separate file. Below is an example:
lp c:\temp\dd_imagefile.bin -rawscan -csv > results.csv
ntfs_scan option
The -ntfs_scan option targets a specified mounted NTFS volume or an image with an NTFS volume. This option starts by scanning the $MFT. Once it finds LNK and/or JumpList files, it will extract their data so it can parse the SHLLINK internals. This is more reliable than using the -rawscan option discussed above, since this approach allows the data to be fully reconstructed prior to parsing it.
If the image one want to analyze is a disk containing multiple volumes, one needs to specify the offset of the volume that will be scanned. This is done via the optional parameter -offset <disk offset of volume>.
The -ntfs_scan option also allows for two sub-options. They allow one to analyze the unallocated clusters associated with the volume and/or any Volume Shadow clusters. These sub-options are -include_unalloc_clusters and -include_vss_clustsers. Using these options together will maximize your chance of getting all the SHLLINK metadata.
Case 3: Parsing Automatic and Custom Destinations files used for Jump Lists
Jump Lists are a new feature, starting with Windows 7. They are similar to shortcuts files in that they take one directly to the files that are used on a regular basis. They are different than the normal shortcut files in that they are more extensible in what information they display. For example, in Internet Explorer, the Jump Lists will display websites frequently visited; for Microsoft Office products like Excel, PowerPoint and Word, they will show most recently opened documents.
From a user's standpoint, Jump Lists increase one's productivity by providing quick access to the files and tasks associated with one's applications. From a forensics standpoint, Jump Lists are a good indicator of which files were recently opened or which websites were visited frequently.
Windows derives the Jump List content from two sets of Destination files:
- a. %APPDATA%\Microsoft\Windows\Recent\AutomaticDestinations\[AppID].automaticDestinations-ms
- b. %APPDATA%\Microsoft\Windows\Recent\CustomDestinations\[AppID].customDestinations-ms
%APPDATA% is resolved to C:\Users\<user account>\AppData\Roaming. One can see that each user account (or profile) has its own set of Destination files.
For most automaticDestinations type files, lp can find and parse the SHLLINK metadata with no special command line options (eg. the default settings). This is because the automaticDestinations type files have a compound file signature, which is built into the lp scanning engine. lp will recognize this signature, reconstruct the allocated/unallocated sectors within the compound file and scan the chunks appropriately. On the other hand, the customDestinations type files only have SHLLINK signatures which do not necessarily occur on sector boundaries. Therefore, to assist lp, to parse this type of file, one invokes the –deepscan switch. This tells lp to scan in a mode that is in-between a normal LNK file scan and a captured image type scan. This switch has no effect on normal shortcut files, so it can be used to handle both shortcut files as well as automatic/custom Destinations files.
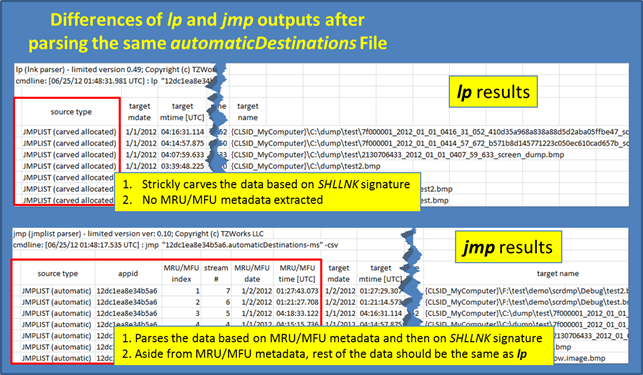
While lp does a good job at pulling out the SHLLINK metadata from both automatic and custom Destinations type files, it does not attempt to parse the MRU/MFU data from the automatic Destinations files. To parse these files in a complete fashion, one can use the jmp tool from TZWorks. The jmp tool understands how to parse both Destinations type files in a manner to extract all pertinent metadata for the investigator.
Below is a comparison of the outputs of running the lp tool and the jmp tool against the same automaticDestinations file. This output is representative of the differences between the two tools. For more information about the jmp tool, one can download and review the readme file for the tool at https://tzworks.com/prototype_page.php?proto_id=20.
Case 4: Parsing a Collection of Files
Sometimes one just wants to parse a bunch of shortcut files that are in a directory or a collection of subdirectories. Compared to the partition scan discussed above, this option is much faster. The disadvantage with this approach over the partition scan, is you don't get artifacts that have been deleted and are still in unallocated or slack space.
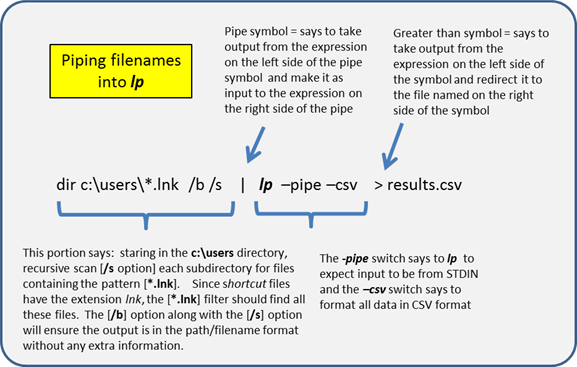
To use this option, one will make use of the operating systems ability to pipe data from one application's output to another application's input. In this case, the source of the data will be the Windows shell command dir. By adding some special options to the dir command, one can output only the path/filename without any extra data. This result will be consumed by lp, and each path/filename passed in will be analyzed. To invoke this behavior in lp, one will use the –pipe switch. The annotated figure below explains how the syntax of the command is composed.
Case 5: Parsing an Active Volume
A variant of parsing a captured image is to parse an active Windows partition or a mounted volume on Linux. The Windows version is invoked by using the -partition <drive letter> option. On Linux, this is handled by passing in the device name of the disk and/or volume as the filename without the use of the -partition keyword. The other option that needs to be set is to identify whether to use the -rawscan or -ntfs_scan option.
If using Linux to run lp, one can located the mounted devices via the built-in df tool. (see snapshot below):
For lp to read at the cluster level, it needs to be invoked with administrative privileges. Like the image file parsing, this option also is agnostic to file system type, as it treats all cluster data (from FAT16/32, exFat or NTFS) the same. Below is an example of lp carving out SHLLINK signatures from a USB drive mounted as drive H for Windows and /dev/sbd1 on Linux. The Windows version is using the -ntfs_scan option, while the Linux version is using the -rawscan option.
        lp -partition H -ntfs_scan -csv > results.csv  [Windows version]
        lp /dev/sdb1 -rawscan -csv > results.csv       [Linux version]
Case 6: Parsing a VMWare Volume
Occasionally it is useful to analyze a VMWare image, both from a forensics standpoint as well as from a testing standpoint. When analyzing different operating systems, and different configurations, a virtual machine is extremely useful in testing out different boundary conditions. This option is still considered experimental since it has only been tested on a handful of configurations. Furthermore, this option is limited to monolithic type VMWare images versus split images. In VMWare, the term split image means the volume is separated into multiple files, while the term monolithic virtual disk is defined to be a virtual disk where everything is kept in one file. There may be more than one VMDK file in a monolithic architecture, where each monolithic VMDK file would represent a separate snapshot. More information about the monolithic virtual disk architecture can be obtained from the VMWare website.
When working with virtual machines, the capability to handle snapshot images is important. Thus for processing a VMWare snapshot, one needs to include the parent snapshot/image as well as any descendants.
lp can handle multiple VMDK files to accommodate a snapshot and its descendants, by separating multiple filenames with a pipe delimiter and enclosing the expression in double quotes. In this case, each filename represents a segment in the inheritance chain of VMDK files (eg. -vmdk "<VMWare NTFS virtual disk-1> | .. | <VMWare NTFS virtual disk-x>" ). To aid the user in figuring out exactly the chain of descendant images, lp can take any VMDK file (presumably the VMDK of the snapshot one wishes to analyze) and determine what the descendant chain is. Finally, lp will suggest a chain to use.
Case 7: Parsing LNK files in Volume Shadows
To tell lp to look at a Volume Shadow, one needs to use the -vss <index of volume snapshot> option. This then points lp at the appropriate Volume Shadow and it starts analyzing the various user directories for LNK files, and if any are found, parses them. Below is an example of traversing Volume Shadow Copy #1 and rendering the CSV results to a file called vss1_out.csv.
lp -vss 1 -nfts_scan -csv > vss1_out.csv
For more information
The user's guide can be viewed here
If you have any questions about lp, contact us via email.
Downloads
| Intel 32-bit Version | Intel 64-bit Version | ARM 64-bit Version | ||||
| Windows: | lp32.v.1.08.win.zip | lp64.v.1.08.win.zip | lp64a.v.1.08.win.zip | md5/sha1 | ||
| Linux: | lp32.v.1.08.lin.tar.gz | lp64.v.1.08.lin.tar.gz | lp64a.v.1.08.lin.tar.gz | md5/sha1 | ||
| Mac OS X: | Not Available | lp.v.1.08.dmg | lp.v.1.08.dmg | md5/sha1 | ||
| *32bit apps can run in a 64bit linux distribution if "ia32-libs" (and dependencies) are present. | ||||||