Windows $MFT and NTFS Metadata Extractor Tool (ntfswalk)
ntfswalk is a command line a tool that traverses a specified NTFS volume reading all MFT entries and pulling predefined statistics as it runs.
Originally the NTFS engine was designed as a widget for other applications to help pull data out from targeted categories of files on NTFS partitions. After successfully using the functionality in other tools, it was determined that the utility in making a standalone tool would be helpful in debugging and understanding the internals of any NTFS volume. This new tool, coined ntfswalk, is named after its ability to walk an entire NTFS volume and output each MFT entry it encounters.
Designed to work with live NTFS partitions, there is also functionality for traversing NTFS images created with the 'dd' utility (as well as some versions of VMWare VMDK files). There are options to filter on file extension, timestamp range, binary signature, partial filenames and directory contents. For the files found, one can list the summary metadata, extract the header bytes, or extract the entire file contents into a designated directory. Since the engine is Windows API agnostic, there are compiled versions for Windows, Linux and Mac OS X.
If targeting a volume mounted on a live Windows system, one needs to be run ntfswalk with administrator privileges.
How to Use ntfswalk
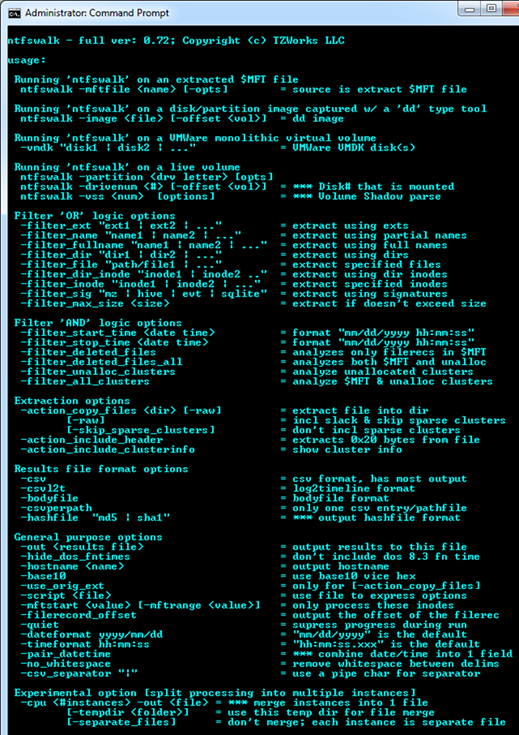
ntfswalk has a number of command line switches, and for the occasional user, it can be confusing which options can be used together and which cannot. Below is a screenshot of the menu options that are displayed when running the tool without any arguments.
To help understand the various options, one can break the architecture into four main areas: (a) source of the data, (b) filter that can be applied, (c) extraction options, and (d) output format.
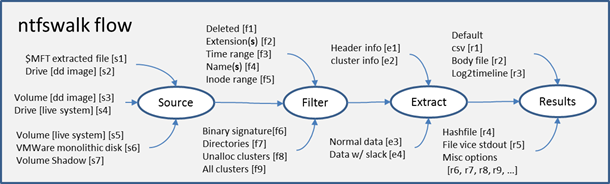
Starting with the first area, this identifies which data sources ntfswalk can handle for input. Various input types include: (i) an extracted $MFT file, (ii) a 'dd' image of a drive or volume, (iii) a drive or volume currently in use on a live system, or (iv) a VMWare single volume disk.
The second area shown above is filtering. This defines what files (or MFT entries) are analyzed and displayed to the user. One can filter on deleted files/folders, extensions, partial names, and binary signatures. For binary signatures, currently ntfswalk allows one to find: registry hives, event logs, SQLite3 databases, or portable executable files. Also in this area one can choose to analyze all unallocated clusters instead of the normal allocated clusters, or to pull files from a specified directory.
The third area in the diagram are the extraction options. Whatever option is chosen, at a minimum, ntfswalk will produce a results file. This results file will contain much of the metadata one needs for forensic analysis. For more detailed analysis, one can add extra data to the results, including: (a) the bytes in the header for each file or (b) the cluster run information. To physically extract the contents of the file, one can specify an archive directory as well as whether to include slack data or not. If one does extract the file data, ntfswalk will compute the MD5 hash of the file and annotate this data to the results file as well.
The fourth area allows one to select how one wishes to see the results. As mentioned above, even if one only wishes to extract data to a directory, there will be a results file that logs all the files passing the filter tests. The default output is plain text, which by itself, has reasonable formatting when viewed in notepad and word wrap is turned off. The other formats are geared for spreadsheet analysis or other post processing tools. Typically, any data containing numbers is defaulted as hexadecimal; however, there is an option to transform the output into base10 notation, if desired. As an add-on to ntfswalk, is the ability to generate a hashset type results file.
The Command Line options for the above
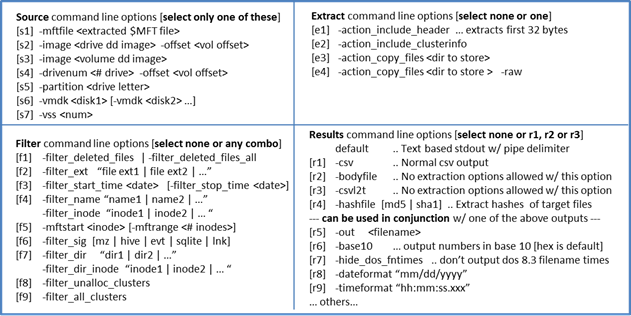
The syntax for each of the options that correlate to the above ntfswalk flow diagram is shown in the figure below. The figure also identifies which options can be used in combination with others. Therefore, one can select: (a) one source of input, (b) none or any combination of filters, (c) none or one extraction option and (d) one type of format for the output results.
Understanding the Output
Lets say you wanted to search all the names in a live volume that contained the string "wordpad.exe" and store the output into CSV format. That way you could double click on the resulting CSV file and Excel could easily open the file. The syntax would be the following for scanning the 'c' partition and redirecting the output to some results file:
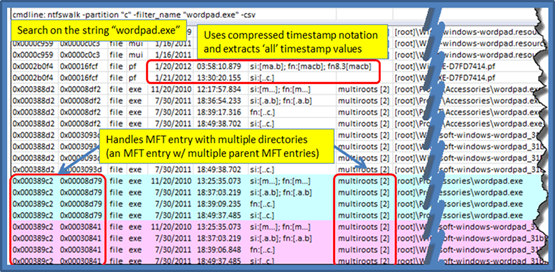
ntfswalk -partition c -filter_name "wordpad.exe" -csv > results.csv
When examining the results.csv file, one would see prefetch, mui and exe entries all containing the string wordpad.exe. Since the prefetch entry has a name longer then the DOS 8.3 length, the normal windows system would have a set of timestamps for the long filename as well as a set of timestamps for the 8.3 version of the filename. Many of these timestamps are duplications, and thus, by using the compressed macb timestamp notation, one can show all the pertinent data without taking too much room, as is highlighted below. Also highlighted, are entries where there are multiple parent directories for one MFT entry (in this case, there are 2 parents for wordpad.exe). This means that wordpad.exe as a single MFT entry, has two hard links to separate directories.
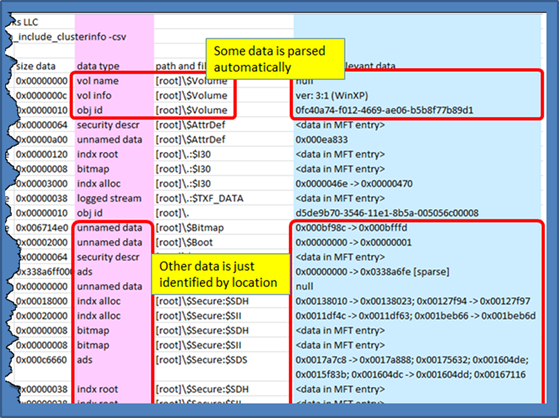
Other data that can be extracted from ntfswalk include cluster information. By using the option [-action_include_clusterinfo], one can view all the cluster information available for each attribute that contains data. Below is an example:
ntfwalk -partition c -action_include_clusterinfo -csv > results.csv
The figure shows a snapshot of a sample output. After trimming out some of the rows/cols, one can see the data type, filename and the location where the data resides. For those datasets that are easily parsed, such as the volume information or object identifier, ntfswalk shows the interpreted data. For other entries, the cluster information is shown, if applicable.
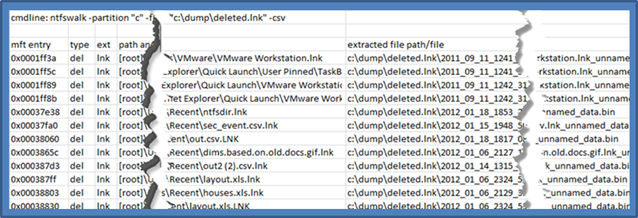
As a third example, if one wishes to extract cluster data associated with a MFT entry, one can use the [-action_copy_files <directory to store extracted files>]. The syntax below shows we want to enumerate only those deleted files that have an extension of lnk. As part of the copy, we tell ntfswalk to copy each of the clusters associated with these resulting files to a dump directory. The syntax of the command is:
       ntfwalk -partition c -filter_deleted_files -filter_ext "lnk" \
              -action_copy_files c:\dump\deleted.lnk -csv > results.csv
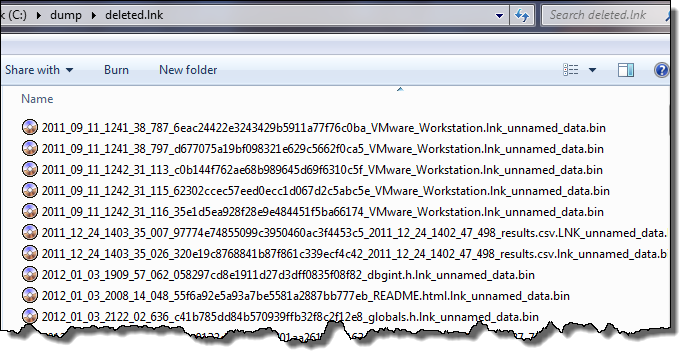
The first figure shows each MFT entry and the associated path/name of the extracted file. The second figure shows the output of the extracted files. The syntax of the extracted file uses <last modify date>_<md5 hash>_<filename w/ extension>_<data type>.bin
Copying files during the session
Extracting files is a common need, especially when gathering critical data from an incident response request. By using the -action_copy_files <root directory> [-raw] [-skip_sparse_clusters] one can direct the files copied to a root directory, but also indicate whether you want file slack (-raw option) or to skip sparse clusters (-skip_sparse_clusters option).
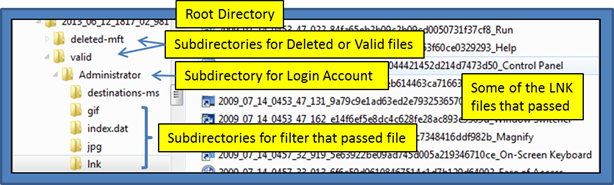
During the copy operation, various subdirectories within the root directory will be created automatically to store the extracted files. The subdirectories are based on: (a) derived user account, (b) whether the file was deleted or not, and (c) what filter caused the file to be passed. Below is a directory hierarchy that was created based on the ntfswalk command:
    ntfswalk -partition c  -filter_ext ".gif | .jpg | .lnk" \
           -filter_name "index.dat | destinations ms" \
           -action_copy_files 2013_06_12_1817_02_981
Generating Hashsets on Target File types
There are a number of excellent tools available on the Internet that perform hashing and creating hash sets. While ntfswalk was not originally designed to generate hash sets, it does have the ability to hash any desired target file. The main difference between ntfswalk's approach to that of a normal hash tool, is ntfswalk accesses the file contents of the file at the cluster level directly, whereas many other hashing tools do not. This becomes more important when considering your target machine may be infected with malware, and whether the actual file contents that are viewed have been masked by malicious software.
Using the switch -hashfile [md5 | sha1] will invoke the hashset option. The hashing routine will only target files with data and only the 'unnamed' data streams vice any alternate data streams. Filtering on executable type files is a good way to generate a hashset on any exe, dynamic link library or driver file. Below is an example of running the option on a Linux box targeting a 'dd' image of a NTFS volume:
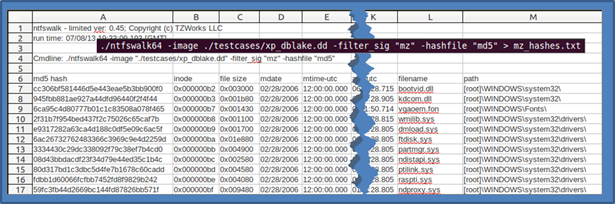
In the example above, ntfswalk scanned the contents of every file to see whether it was an executable (independent of what the extension was) or not. If it determined that a PE (or 16 bit version of a exe/dll) signature was present, it computed the MD5 hash of the contents. As you can imagine, this process takes some time depending on the size of the volume you are analyzing.
For more information
The user's guide can be viewed here
If you would like more information about ntfswalk, contact us via email.
Downloads
| Intel 32-bit Version | Intel 64-bit Version | ARM 64-bit Version | ||||
| Windows: | ntfswalk32.v.0.95.win.zip | ntfswalk64.v.0.95.win.zip | ntfswalk64a.v.0.95.win.zip | md5/sha1 | ||
| Linux: | ntfswalk32.v.0.95.lin.tar.gz | ntfswalk64.v.0.95.lin.tar.gz | ntfswalk64a.v.0.95.lin.tar.gz | md5/sha1 | ||
| Mac OS X: | Not Available | ntfswalk.v.0.95.dmg | ntfswalk.v.0.95.dmg | md5/sha1 | ||
| *32bit apps can run in a 64bit linux distribution if "ia32-libs" (and dependencies) are present. | ||||||